How we made a custom tool board, whether it’s your first time or even if you’ve been before. We had a pegboard up for years, and in that time We came to realize that We don’t like pegboards.
It seemed like every time We reach for a tool, We’d either knock another one-off, or maybe the little peg that holds the tool would fall out of its slot. It was just always a pain. It seemed like the design thinking of a pegboard was to make it easy to rearrange, but not a lot of thought went into making it good and holding the power tools.
Since We never once rearranged my pegboard in all those years, We decided to build something that would be better at its main purpose, which is holding the tools.
The first thing We did was measure out the space to help me determine the size We wanted for the board. Then We started marking the Studd locations just above and just below where the board was going to go.
Using homemade saw tracks, We cut a cheap piece of plywood to act as a sort of a backing board.
This is partly because the walls in the garage are pretty uneven and we wanted to be able to create a flat surface for the tool board.
With the piece cut, We determined the curve of the sheet and then flipped it over so that the convex side was facing up.
We drilled a pilot hole and a countersink in each of the two upper corners. We then made some extra-large marks to help me align the board on the wall. We got the board aligned as closely as We could with the mark, and then fired a few Brad nails to hold it to the wall.
We drilled a pilot in the direction through one of the holes We had pre-drilled and drove a screw.
We checked if the board was level and made adjustments. This works because the brad nails aren’t strong enough to resist the force of the hammer. Once it was level, We added the other screw to the other pre-drilled hole. We use my straight edge to mark lines along the entire length of the stud locations.
Then use the straight edge to identify the high and low spots. We just marked them with a pencil at first, but then came back and marked them with a construction crayon so they’d be easier. After that, We drove lots of screws while trying to pull the high spots down until the board surface was level. We kept the routine going, checking for high spots and driving screws until the board was level and until We had enough screws to hold the weight of everything.
Using a homemade saw track, once again, We cut a higher quality piece of plywood to match the size of the cheaper piece already on the wall.
We created a uniform series of marks and then pre-drilled pilot and counter sinkholes, making sure each screw head would be an appropriate depth.
This board was quite a bit heavier than the first one, so We used a couple of clamps to help me hold it up in place. We didn’t want to beat on one with a hammer, so We checked for level before firing some Brads to hold it up. We added a couple of screws just to make sure the weight was supported, then we removed the clamps and drilled the rest of the pilot holes into the studs. We used short screws everywhere.
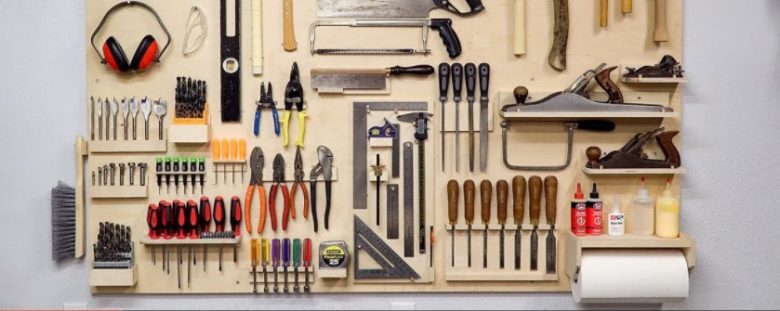
There was a high spot to make sure it couldn’t reach the stud and pull the sheet too close to the wall. Not all of the screws need to make it to the studs. They just need to make it to the underlying sheet of plywood because it has plenty of holding power with all the screws We used on it. We added six coats of polyurethane while being sure to lightly sand in between each coat. The board came out nice and flat, We set out all the tools I hoped to add to the board and started arranging them in different ways until I had a good idea of how to start.
Pretty much all of the tool holders are custom. We built each one custom because We wanted to make sure they all met certain criteria.
We wanted them to be secure so that neither the tool nor its holder could easily be knocked off the wall or knocked off the wall unintentionally.
Number two, We wanted each tool to be easy to remove. Number three, I wanted to make sure each holder was as minimal as possible to make the most efficient use of space available.
We wanted to be sure there was enough room to remove each tool without bumping into other tools on the wall. The position of the first tool holder, We are adding, may be arbitrary, but it has been carefully measured and takes into account the tool holders that will go around it.
We secured most of the tool holders to the wall using just pen nails so that they’d be easy to remove.
We used magnets for some tools, but the magnets weren’t really strong enough to keep the tools in place. So We created these little grippy disks with hot glue to help provide the friction necessary.
We shot the PIN nails at opposing angles, which holds very securely, but is still easy to remove the pin nails also don’t leave much of a blemish and what is left can be pretty easily filled with some beeswax. There are lots of holders on the board, and again, most of them are held in with small nails of some kind.
The planes have been the only items heavy enough to warrant the use of screws and each of the plane holders is just an L-shaped shelf with a couple of small pegs to help prevent the plane from sliding off the front.
The bottom portion of each shelf is secured to the worn-out portion of each shelf with screws.
We used a thicker board as the Wall Mount for the heaviest plane so that I could stagger the screws that hold the shelf together. It helps make for a stronger joint. We rounded the front corner of this plane’s shelf so that We could more easily reach in to grab the plane below it.
Since my marketing tools are somewhat delicate, We paid special attention to their holders and again, all holders are designed to hold the tools so that they are easy to grab.
Yet hard to knock off accidentally, the hammer wouldn’t stay flat with angled dowels. So I created dolls that were straight with more dolls to keep them from falling off.
Hammer was good with Angle Dals but needed just a little extra block to help it stay flat. Lots of the Power tools are held in place just using simply finished nails, but We’ve also come back and added extra nails all over the board to help tools maintain their position. This is nice because We’ve used a leaf blower to blow the dust off of the tool board without having to worry about things flying around or flying off the wall.